
Introduction
PageTrack serves multiple purposes, primarily providing easy access to the InDesign documents for each issue of your publication. It also enables others to track the publication’s progress during its creation.
Product Manager is the application used to create each issue of your publication for PageTrack. This document will explain the various methods for creating a product.
The system administrator manages access to Product Manager. If you need access, please send an email to scoop@newspapersystems.com to request it.
In both PageTrack and Product Manager, an issue of your publication is referred to as a “Product.”
A Product contains pages. Depending on the format of your publication, a Product may contain pages divided into physical or logical sections/edtions.
This article will explain how to use Product Manager to create a variety of publications.
Launching Product Manager
After you have logged into Scoop, you should see Product Manager listed in the Application Launcher as shown below.
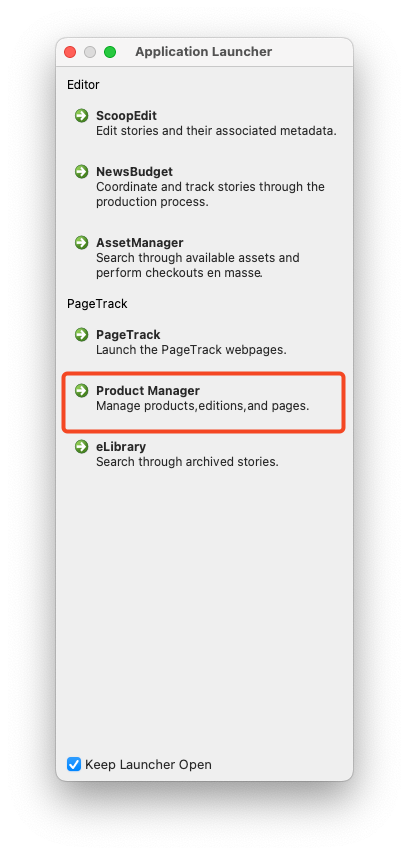 Click the highlighted entry to launch Product Manager
The main window
When Product Manager first opens, nothing will be loaded immediately. Along the top of the main window are several icons for frequently used features.
When referring to keyboard shortcuts, the indicator CTRL/CMD is meant to be interpreted as “use the Control key on Windows or the Command key on Mac”.
Icons
The numbered icons in the image below are explained in the text following the image. The basic function of the feature will be explained below, a detailed explanation of the function will come in subsequent sections.
![]()
- New - Opens the Product Setup dialog. This dialog is used to populate the initial parameters of a product. There is a correlating menu entry under File → New. The keyboard shortcut is CTRL/CMD+N.
- Open Product - This will open a dialog to allow you to select an existing product to open. There is a correlating menu entry under File → Open. The keyboard shortcut is CTRL/CMD+O.
- Revert to saved - In the event a user is editing a product and makes a mistake, clicking this option will revert the product configuration to the last saved version of the product. A product is “Saved” when the green “Go” button is pressed. The Go button is also referred to as Create Product. There is a correlating menu entry under File → Revert to saved.
- Add edition/section - This feature is commonly used to create broadsheet sections within a single publication. Clicking this icon will present the Edition/Section Setup dialog. There is a correlating menu entry under Actions → Add edition/section.
- Change format - The Format change function is used to add, remove, or reorder pages within an edition/section. There is a correlating menu entry under Actions → Change format
- Create Product - Once a Product has been configured or modified, clicking this icon will create the new product or update the existing product. There is a correlating menu entry under Actions → Create Product
Product Creation
There are three methods for creating a product in Product Manager:
- Manually Create
- Create from a Product Manager Template
- Import a Product from an Ad System
Manual Creation
Manually creating a product is useful when you do not have a file from an advertising system or when you need to create a product on-the-fly.
Here are the steps for manual creation:
- Click on File → New.
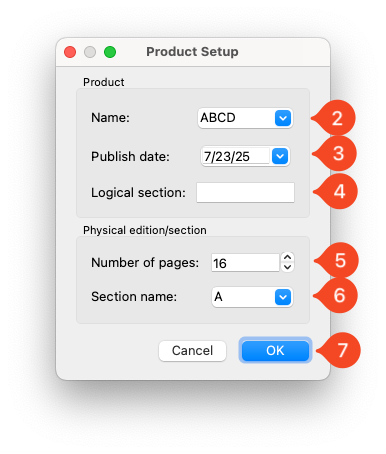
- In the Product Setup dialog that appears, click the list icon next to the Name field to choose the product code for the product you are creating. If you need to enter a code manually, ensure it matches the character length of the codes in the list. For example, if the list contains four-character product codes, you should type a four-character code. In this example, we will use the product name ABCD.
- Set the publication date to match the date of the issue.
- In most configurations, the Logical Section option is not used; you can ignore this field unless instructed otherwise.
- Enter the number of pages for the edition or section you are creating. If you are creating a broadsheet newspaper with multiple physical sections that reset page numbering at the start of each section, enter the number of pages in the first section.
If your product has multiple sections, refer to the Change format section of this article to learn how to create the additional sections in the product.
- Set the Section Name to “A” for the first section. If your product does not use section letters, you can leave it set to “A.” Your configuration is set to ignore this value.
- Once you have completed the Product Setup dialog, click OK.
![Product Manager]()
Setting page Templates
When a Product is created manually, the pages are created without a Template defined. Using other methods, the page Templates will be set.
Setting one Template at a time
To specify the page Template for a given page double-click on the Template field for the page in question. To complete the entry of the Template you can press Enter or click onto another field.
Setting multiple Templates at one time
To set the Template for multiple pages at the same time you can use either of the following methods to select the pages.
CTRL/CMD Click method - Used to select various pages not necessarily in sequence.
- Click on the first page Template you would like to set.
- Press and hold CTRL/CMD click on each of the other page Templates you would like to set. The result will be the Template field turning blue.
- With the CTRL/CMD key still pressed, double-click on one of the Template fields you selected.
- Release the CTRL/CMD key
- Choose the Template from the list in the field you double-clicked on.
- To complete the entry of the Template you can press Enter or click onto another field.
Shift Click method - Used to select a range of pages in sequence. There are actually two approaches to this method.
- Click on the first page Template you would like to set.
- Press the Shift key down and hold it.
- Click on the last page in the sequence.
- With the Shift key still pressed, double-click on one of the Template fields you selected.
- Choose the Template from the list in the field you double-clicked on.
- To complete the entry of the Template you can press Enter or click onto another field.
OR
- Press the Shift key down and hold it.
- Click on the first page Template you would like to set and drag down or up to the last page in the sequence.
- With the Shift key still pressed, double-click on one of the Template fields you selected.
- Choose the Template from the list in the field you double-clicked on.
- To complete the entry of the Template you can press Enter or click onto another field.
Using Product Manager Template
It is common for publications to create products with the same page counts, template configurations, and other specifications on multiple occasions. There may be various configurations available. In Product Manager, we utilize Product Templates to simplify the creation of these products.
Product Templates allow users to establish a configuration that defines all aspects of a product, except for the date. When creating a product from a Product Template, users only need to select the desired template and specify the date.
How to create a Product Template
- Open an existing Product that exemplary of the Template you would like to create.
- From the menu in Product Manager choose File → Save as template
- In the resulting dialog enter a name for the Template in the Template name field.
- Click OK.
 Product Manager Template dialog
Creating a Product from a Template
- Log into Scoop and open Product Manager.
- From the menu choose File → New from template.
- Select the Template to be used.
- Click OK
- In the Product Setup dialog set the date for the Product to be created. It is also possible to change the Product Name at this point. This allows more flexibility with Templates.
- After the date and/or Product is set, click OK.
- Make any required changes to the Page Templates, Department, Deadline, or Responsible fields.
- Click the green OK button to create the Product.
Import a Product from an Ad System
Product Manager can use the Edition Design File (EDF) from Layout-8000 to create a product. Product Manager parses the EDF to determine the required number of pages and assigns templates to these pages based on the group assignments from Layout-8000.
In Layout-8000, Groups are used to assign advertisements to their appropriate general locations within the publication. Examples of these groups include News, Sports, Features, and Opinion. In PageTrack, we typically create InDesign documents as templates for the pages. These documents are designed to contain pre-placed elements relevant to the content of each page. If there are InDesign documents with names matching the group names in Layout-8000 available in PageTrack, Product Manager will use these matching InDesign documents as templates for the respective pages.
Steps to create a Product from an EDF
- Log into Scoop and open Product Manager.
- From the menu choose File → Fetch product from ad system.
- Select the EDF for the Product you are trying to create. (NOTE: You should have been instructed on where these files are stored. On Windows it will usually be P:\AdFiles\OUTEXT on a Mac it will be in the PageTrack volume mounted to your Desktop. The files will be in the AdFiles\OUTEXT folder.)
- After selecting the EDF, confirm that the Product Name and date are correct.
- Click OK to complete the import process.
- Make any required changes to the Page Templates, Department, Deadline, or Responsible fields.
- Click the green OK button to create the Product.
Adding editions/sections
(More to come)
Optional settings for Products
The following settings for products are entirely optional. While they can enhance the value of PageTrack, using them is completely up to you.
Setting the Department, Deadline, and Responsible fields
These fields are displayed on PageTrack and can be adjusted if desired. The same rules explained earlier for selecting and setting the page templates apply to these fields.
Setting Plate/Color settings
It is possible to specify which pages in a Product are color. The function is available from the menu under Actions → Plate/Color settings. Product Manager assumes every page is color. This has no real implications. PageTrack simply will show the page is color. There is no additional function.
The Plate/Color settings are defined for each edition/section independently. When the dialog opens the option for Paired pages will be active.
The Paired pages function is very basic and will not necessarily agree with your press configuration and should not be relied on. It is suggested that you turn it off and set the color on each page individually.
To designate a page as “Gray,” click on the Color value for each page you want to change. Clicking it a second time will revert the value back to Color. Please note that there is no multi-select option in this dialog.
Open Product
To open a Product, select File → Open Product. In the dialog that appears, you can either scroll through the “Available Products” to find the one you want or use the Search function.
The Search function allows you to look for any part of the names in the “Available Products” list. The naming convention for these Products is consistent, regardless of the Document Naming Convention used in your PageTrack instance. The only difference is the number of characters used for your publication, which are the characters that appear before the underscore in the Product Name.
If you want to search for a particular Product on a specific date, you can type the date using the format of year-day-month, for example September 1, 2025 would be specified as 2025-09-01.
Once you have selected the Product you would like to open, click OK.
You can only open one Product at a time.
Add and Removing editions or sections
Change format
There are times when the size of the Product changes or the order of pages need to be changed. The Change format function addresses these needs.
It is important that any of the documents to be affected by this modification be closed. If pages are going to be inserted into the middle of a Product, some pages will be renamed. Those pages must be closed for the function to complete.
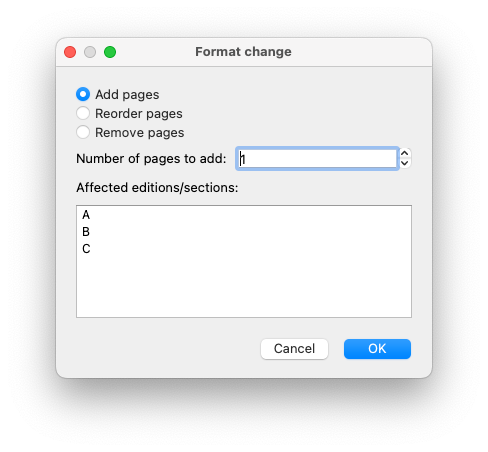
Add pages
The following example will show how to add four pages to the sixteen page A section of a Product.
- Open the Product and choose Actions → Change format to open the Format change dialog
- Click on the Add pages option
- Enter the number of pages you would like to add
- Select the affected edition/section.
- Click OK.
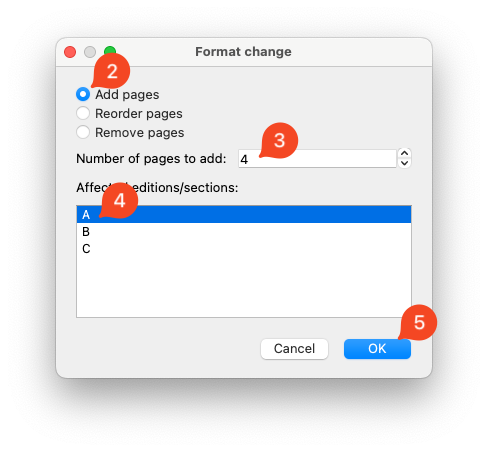 Adding four pages to an existing edition/section.
The next dialog allows the user to adjust where the new pages are positioned. If the Product has been started and editorial content is present, it is important to ensure the pages are closed.
Notice the new pages have been added to the end of the existing edition/section. The new pages are indicated by the letter “N” as in “New”.
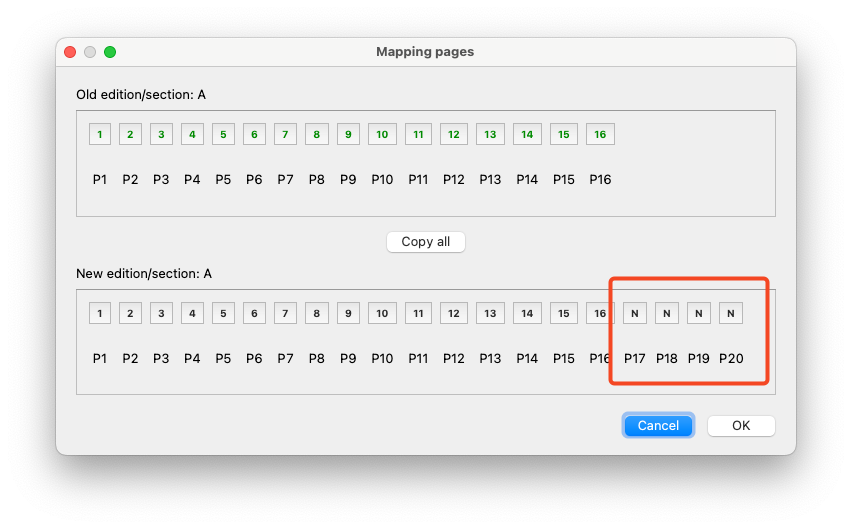 New pages appear at the end of the “New edition/section”
For this example, four new pages will be inserted into the middle of the edition/section, becoming pages 8-11.
The user will map the new positions of the original pages following the expansion. To do this, the user should first click on a page in the “Old” edition/section, then click on the corresponding page in the “New” edition/section. It is easiest to start from the end of the section and work backward, effectively shuffling the new pages into the book.
Refer to the image below for guidance. The user first clicks on page 16 (1) in the Old edition/section, then clicks on page 20 (2) in the New edition/section. This process continues from “Old” to “New” until the four new pages are placed in positions 8-11.
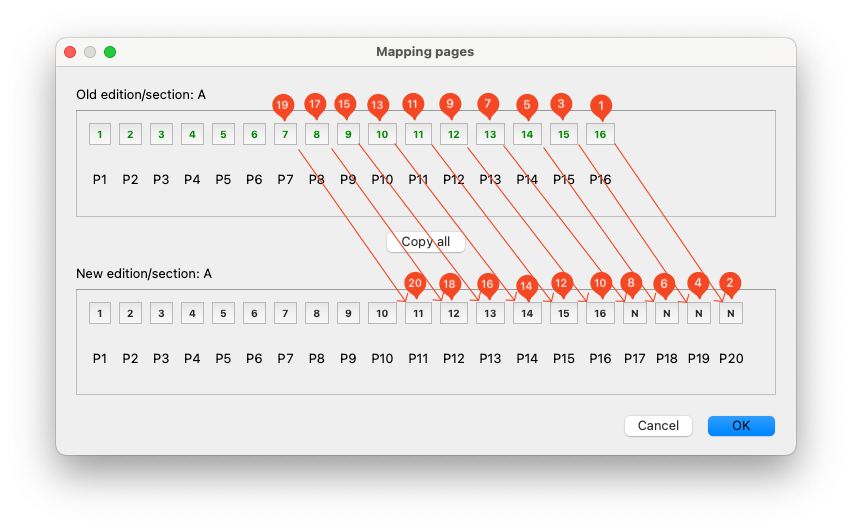 Following these steps the user can move the new pages from the end of the edition/section to the correct location.
The result follows
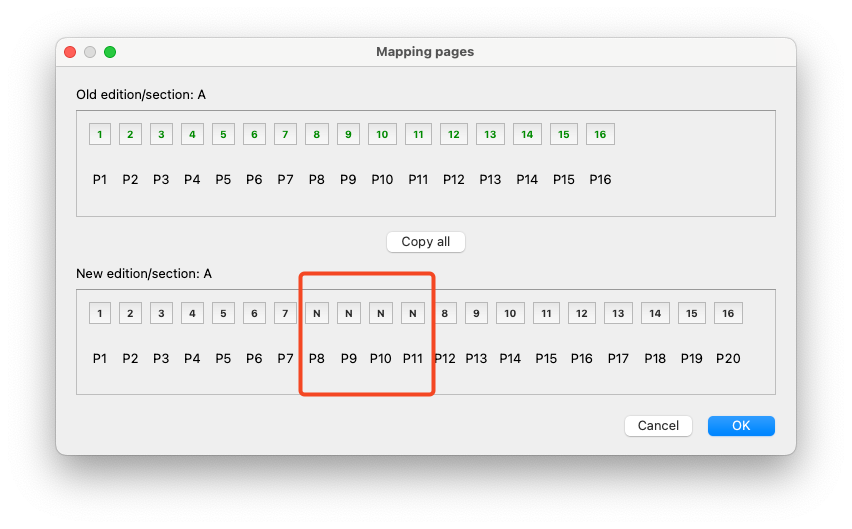 The new pages have been moved to the range of 8-11 as required.
Once the mapping is complete and the user clicks “OK” to finalize the changes, it is crucial to review the templates applied to the new pages, as adjustments may be necessary.
Finally, after updating the product, click “Go” to save the changes.
Remove pages
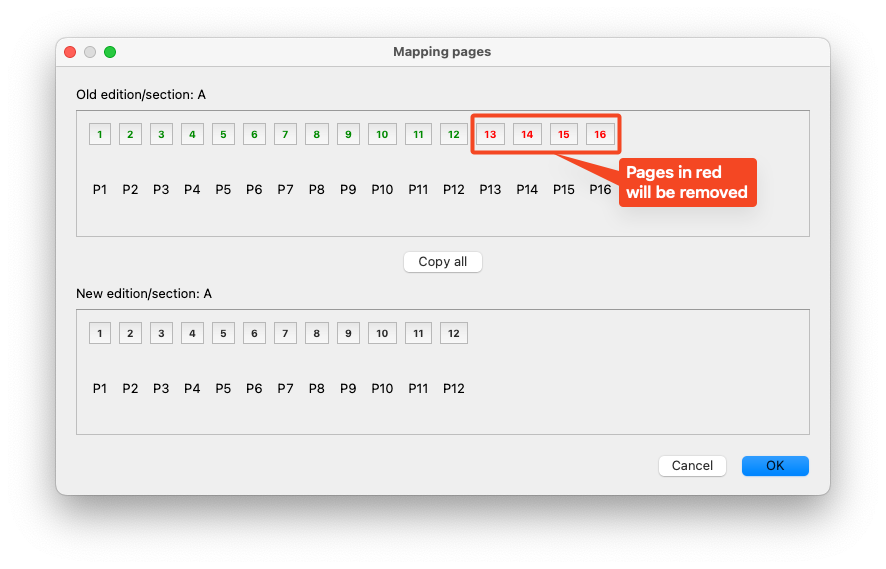
When removing pages, you will specify the number of pages to be removed, the affected edition/section, and which pages will be removed.
- Open the Product and choose Actions → Change format to open the Format change dialog
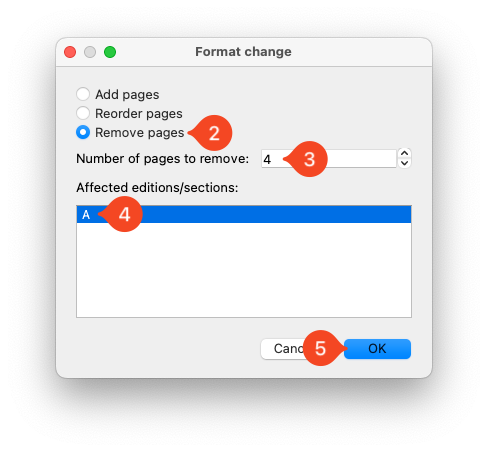
- Click on the Remove pages option
- Enter the number of pages you would like to remove
- Select the affected edition/section.
- Click OK.
For this example, four new pages will be removed from the end of the edition/section.
Reorder pages
Reordering pages can be used when pages have already been started to move one page to another location in the product. Considerations have to be made for how this can impact ad placement as well as positional challenges like moving an odd page to an even page location.
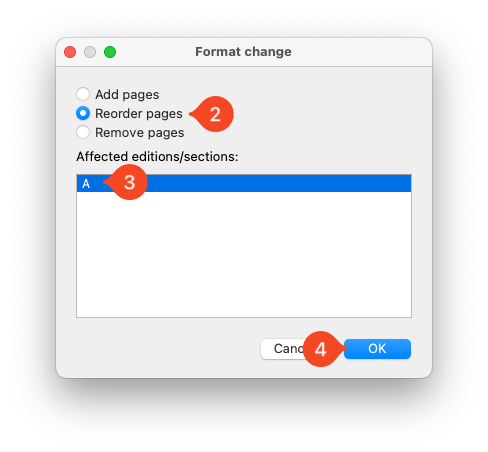
- Open the Product and choose Actions → Change format to open the Format change dialog
- Click on the Reorder pages option
- Select the affected edition/section.
- Click OK.
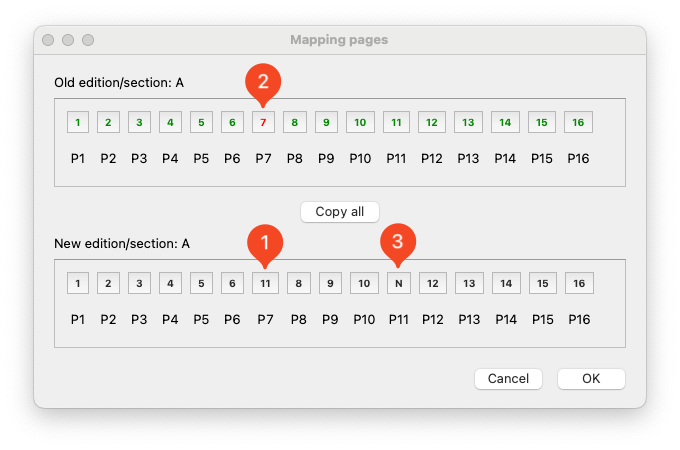
The resulting dialog, first select the page in the Old edition/section then choose the new page nummber the page should become. In this case we will move page 11 to page 7.
- Click on page 11 in the Old edition/section to indicated this is the page to be moved.
- Click page 7 in the New edition/section to indicate this is the new location for page 11.

The result should look like the image shown below.
- Page 11 is set to become page 7 in the New edition/section.
- This has left page 7 in the Old edition/section showing in red and …
- Page 11 in the New edition/section showing as N meaning “New”.
Clicking ok at this point would move page 11 to page 7 and create a brand new page 11 after clicking OK to the Mapping pages dialog and then clicking Go on the Product Manager main window to update the product.
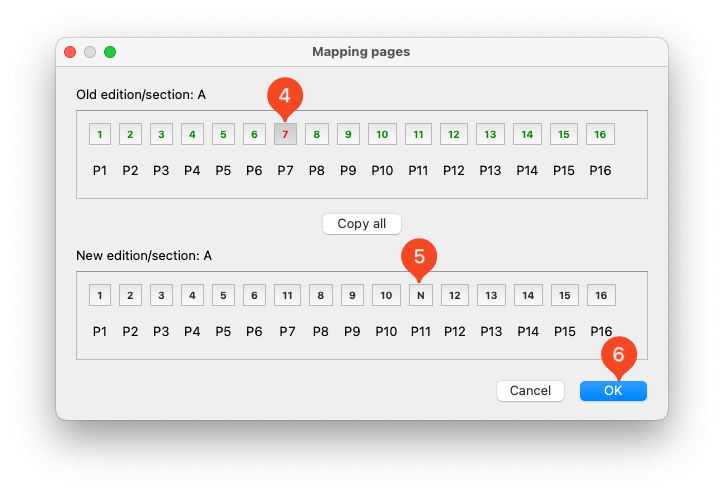
If the intent was to swap pages 11 and 7, you should complete the process before clicking OK by dowing the following
- Clicking on page 7 in the Old edition/section.
- Clicking on page 11 in the New edition/section.
- Clicking OK on the Mapping pages dialog.
Finally, you have to click the Go button in the Product Manager main window to update the product.
Create Product
Once a Product is configured, clicking the green Go button to run the Create Product function will create the Product in PageTrack. Once the process completes, you should see a message saying Product created successfully. If you see any other message, please call SCS at 610-746-7700 and ask for help with Scoop because “Product Manager showed an error”.