
Scoop 7.4.2 End-User Manual
© 2017-2021 Software Consulting Services, LLC.
© 2017-2021 Scoop Publishware AB
All rights reserved.
Welcome
This manual serves as a guide to the Scoop editorial system. We assume that your Scoop distributor has already installed and configured Scoop, and that you are already familiar with basic terminology of the operating system you intend to use Scoop on.
If you were familiar with Scoop 5, then you should feel right at home in Scoop 7, as while we have completely re-engineered the system from the ground up, we’ve retained a large number of the workflow paradigms from Scoop 5. But if you are not familiar, this section serves as an introduction to Scoop as a whole and some of its design philosophy.
Any modern newspaper or magazine has a complex flow of news, advertisements and other editorial material. With Scoop, a newspaper’s workflow might look like this:
The editor-in-chief plans upcoming issues and makes assignments.
Text and photos from your CMS, wire services, local editors, correspondents and freelancers are sent directly to the desired basket in ScoopEdit, using Content Manager.
Reporters and photographers create complete articles including text format, photos, summaries, etc. and send them to the editing department, with ScoopEdit.
The editors place text, photos and advertisements with a publishing program, importing the text formatting, associated images, and other metadata from ScoopEdit using a plugin.
Page layout and production is set up, assigned, and monitored, on a minute-by-minute basis, with PageTrack.
As well as being placed within page layouts, stories are also exported to your web CMS for online distribution, with Content Manager.
All stories are archived in full-text with eLibrary, along with PDFs and images of the pages they ran on, for search or reuse at any time.
Of course, Scoop is designed to be adaptable to a wide variety of different modes of operation, and so most of these modules can be re-configured to handle differences in usage. Thus Scoop lets you choose your own workflow.
No matter what your workflow is, Scoop always is configured so that there is a central server which all the client programs (through the launcher) connect to through an encrypted protocol, so your data is always stored and up in a central location and accessed securely. Because of this, Scoop is almost entirely machine-independent, handling synchronization and file management transparently so that you can focus on creating great content.
Table of Contents
Launcher
All of the desktop applications in the Scoop suite are managed and run through a single program, which will appear on your desktop or in your operating system’s software list as “Scoop”, and is hereafter referred to as the “Scoop Launcher”.
Installing
Your distributor or system administrator has likely already installed Scoop for you. If not, then follow the appropriate steps for your platform:
On Windows: Run the installer provided to you either by your Scoop vendor or your local Scoop administrator. It will install Scoop either for your user only, or (if run as Administrator) for all users, and place shortcuts to it on your Desktop and in your Start Menu.
On macOS: Mount the “dmg” provided to you either by your Scoop vendor or your local Scoop administrator, and copy “Scoop.app” to wherever you keep applications.
On Linux: Consult your Scoop vendor for information and guides on installing the Scoop Launcher on Linux.
Signing in
Upon starting Scoop, you will be greeted with a sign-in dialog.
Enter your username and password as provided by the local administrator or Scoop vendor.
Scoop will always remember your Server address and Username, but it will forget your password each time you exit, so you will have to sign in again.
If your local administrator has enabled the feature, you may reset your password by clicking the arrow to the right of the Login button and selecting Reset password, and then entering the email address already associated with your account.
If you have already used ScoopEdit at least once, you can work on articles in your Local basket without an internet connection by clicking the arrow to the right of the Login button and selecting Work offline.
Upon signing in, the Launcher will usually display the Application Launcher so that you can choose what application to open.
Application Launcher
Scoop is comprised of several sub-applications, all of which are contained within the main Scoop Launcher. The Application Launcher allows you to choose which one to launch.
Note that the local administrator has the power to restrict access to applications, so if you do not see all the same applications as are in the screenshot above, it is likely because you have not been granted access to them (or they could be disabled entirely.)
If you only have access to one application (for example, ScoopEdit), you will not see the Application Launcher at all, and that application will start immediately after you sign in.
User menu
Inside each main window of each sub-application, you will see your name as an option on the far right of the menu bar. This is the “User” menu.
(On macOS, the items found in the “User” menu may be instead found in the “Scoop” Application Menu.)
The options are as follows:
Launch application. This menu contains actions for all of the Scoop sub-applications that you have access to, so that you may start another application (without closing the one you presently have open.) It might not be visible at all if you have access to only one application.
Account settings. Here you may change your display name, email, and password, as well as modify your personal spellcheck dictionary, or change the format Scoop displays dates and times in.
Sign out. Ends your present session and closes all open Scoop applications. (The next time you start Scoop, you will have to to sign in again.)
About Scoop. Displays the running Scoop version and copyright notice, with the option to show or copy more detailed information about the client and server builds.
ScoopEdit
ScoopEdit constitutes the core of the complete editorial system – it is used by reporters, editors, photographers, and supervisors to perform writing, editing, printing, web production, and archiving.
Most users of Scoop will likely use ScoopEdit exclusively, with the exception of managers, administrators, and paginators.
Main window
ScoopEdit’s main window primarily consists of three panes, combined with a toolbar and a status bar.
Basket list
This list shows the baskets you have access to, as configured by an administrator. Basket access usually differs for reporters, editors and supervisors – and for different departments.
Kinds of baskets
There are four kinds of baskets:
Standard basket: a basket that directly contains articles. (Most baskets will be of this kind.)
Cabinet basket: a virtual basket which serves to group other baskets. Generally, when viewing a cabinet basket, you will see all articles from all baskets contained within it – cabinet baskets do not contain any articles of their own.
Search basket: a virtual basket which displays search results. Permanent search baskets may be configured by your administrator, but if you run a manual search, the results will also be displayed in one of these.
Local basket: a special basket whose contents are stored on your local computer, instead of in the Scoop system, so that you can write and edit stories without being connected to the Scoop database. (This basket is limited in functionality compared to standard baskets.)
General paradigms
Typically, every user will have a “personal” basket with the same name as their username, and if they belong to a group, the “group” basket also. Stories are generally written starting in one of these baskets, or in the “Local” basket if you are, or intend to, work without a connection to the Scoop system.
Once the articles are ready to be edited, you will typically send them from your local, personal, or group basket to the next basket in your newspaper’s workflow, and from there to a ‘pagination’ basket or a ‘CMS’ basket, for output into a page or to a web CMS.
Of course, every newspaper has a different workflow, so yours may follow a different model altogether. Consult your local administrator and documentation for more information.
Notifications
Right-clicking on any ‘standard’ or ‘search’ basket will yield a menu with notification settings. There are three options you can enable, to trigger notifications on different kinds of changes:
articles inserted: If enabled, triggers notifications when an article is added to this basket (either by a new article being created, or an article being sent from another basket.)
articles changed: If enabled, triggers notifications when an article is changed within this basket, either by being edited or having its metadata modified. (Note that edit notifications only occur at the time the article is unlocked, not during an edit session.)
articles deleted: If enabled, triggers notifications when an article is deleted from this basket.
If any of the pertinent events occur while notifications are enabled, the basket icon will be marked with a red circle, and the basket’s name will be bolded. In addition, if you do not have the ScoopEdit window active at the time the event occurs, system a pop-up notification will occur. (Note that actions you take will not trigger notifications for you!)
Notification settings will be remembered along with your user account. If at any time you need to temporarily ignore notifications, you can mute (and subsequently unmute) them using Action → Mute notifications, or turn all notifications off by using Action → Reset all notifications.
Further, note that Scoop must be running and connected to the server in order to receive notifications at all.
Article list
This pane shows the articles in the basket you have selected in the Basket list.
The statuses of the articles are displayed as colored circles (though if your local administrator has disabled statuses, then they will not appear at all) next to the article name. If an article is locked for editing and/or has been placed on a page, then its status circle will be overlayed with small icons to indicate this.
By default, the list shows only the status and name of each article and is sorted by the article name, but more metadata fields can be shown, or the sort field changed, using the icon buttons in Article info, or by selecting an option in Action → Sort by.
When you select an article, Article info and Article preview will be updated to display information about it. If you have permissions to do so, you can double-click an article to start an edit session of it.
There are two different context menus within the article list, respectively triggered based on where the request for the context menu occurs:
in the status icon column: options to sort by status, or change the status of the current article.
anywhere else: options to perform various actions on the selected article(s).
While the ‘mark’ context menu actions will be discussed later on (in ‘Find in articles’), the rest of the article actions context menu options are discussed here:
Open article
Opens the selected article(s) for editing. (It is indeed possible have multiple articles open at the same time.)
If you do not have permission to edit articles in the basket the selected article(s) are contained within, or other users have locked some or all of the selected articles for editing already, you will not be able to open some or all of the articles you have selected.
The topic of creating and editing articles is further discussed later on.
Delete article
Deletes the selected article(s).
Note that deleting an article in any except the “Local” basket is a reversible action; it does not completely remove the article from the Scoop system, but merely marks it as deleted (i.e. its status will change to “deleted,” represented by a trash can icon.) It will only be permanently removed from Scoop when an administrator purges deleted articles, or sets up a task to run periodically to purge deleted articles.
Once you (or someone else) has deleted an article, it will not immediately be hidden from view, but will remain visible until you manually refresh the list (by using the Refresh basket option) or change what basket you are looking at.
You can view deleted articles in your current basket by choosing Action → Show deleted articles. Changing the status of a deleted article, or attempting to edit a deleted article, will cause the article to be un-deleted.
Article properties
Opens the article properties dialog for the selected article(s), in order to edit the metadata fields associated with an article.
Next to each metadata field is a check-box: if it is checked, then the accompanying field will be modified when you click ‘Save.’ If that box is not checked, the field will not be modified; that is, it will retain the previous value it had before you started editing the article properties.
If you have more than one article selected when choosing to edit article properties, be careful what fields you edit, as they will then be set to the same values on all of the articles you have selected!
The various metadata fields that can be seen and edited in the article properties dialog should either be self-explanatory, or configured specifically for your newspaper by your local administrator.
Show versions
Shows all the versions of the currently selected article(s) in the articles list.
Every ‘edit session’ constitutes a new version of an article: that is, each time an article is opened, edited, saved (whether one time or hundreds of times), and closed, a single new version is created.
In addition to viewing the contents of an older version of an article by select it in the list, you can select an old version and choose to ‘open’ it. However, this will not edit the older version you have selected, but will merely copy its contents to become the next version of the article.
Status bar
The status bar displays information about the basket you are currently viewing. The icons indicate what permissions you have to the selected basket. These and their corresponding permissions are as follows:
Viewing articles allowed: you can view articles in this basket.
Editing allowed: you can edit articles in this basket.
Deleting allowed: you can delete articles in this basket.
Sending to allowed: you can send articles to this basket.
Sending from allowed: you can send articles from this basket.
Placing allowed: you can place articles onto pages from this basket.
If you do not have any one of these permissions on a basket, its icon will be struck through with an .
Following the icons, there is a label displaying statistical information about the articles you presently see, or presently have selected. The information displayed is: the number of articles, total character count, total word count, total measure depth (in your preferred unit of measure), and (if all articles displayed or selected have a ‘target depth’ specified) the percentage of the target depth fulfilled.
Toolbar
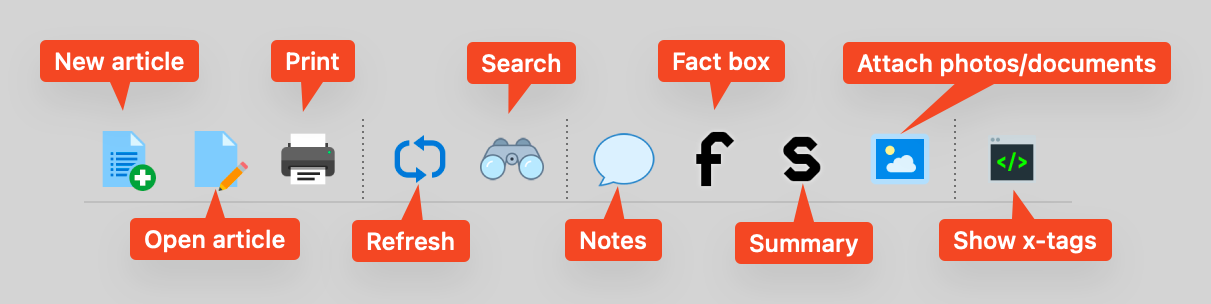
The toolbar contains the most-used actions relating to article creation and editing, and as such, most of its buttons will be disabled if you do not have an article selected.
Most of the actions the buttons perform were either discussed along with the article list, or will be covered in more detail further on, but a few not related to other major functionality are described here:
Print: Prints the selected article.
(There are various options for what to include when printing articles that can be
turned on or off in the ScoopEdit Preferences dialog.)
Refresh basket: Re-fetches the article list of the current basket.
(Typically, Scoop will refresh the list automatically and transparently. However, if
articles have been deleted while you are viewing a basket, refreshing the list will
hide them from view; or if you were temporarily disconnected from the server, it
may be necessary to manually refresh to restart automatic refreshes.)
Show X-tags: When enabled, displays the plain-text markup source of articles
in the preview window and in the article editor, rather than the rich-text
what-you-see-is-(mostly)-what-you-get view.
Article info
Displays metadata and other information about the presently selected article. The fields displayed are as follows:
Article name: The article’s name. (This field is editable.)
Author: The article’s creator, and when the article was created.
Last edited by: The last person who edited this article, and when. (When an article
is presently locked, this field becomes Locked by and displays who or what
locked the article for editing, and when.)
Assigned to: The users (if any) this article has been assigned to by managers.
Sent from: The basket this article was sent from (if any), and when.
Sent to: The basket this article was last sent to (if any), and when.
Placed into: The DTP document this article was placed into (if any.)
Template: The editor and template this article utilize.
Article ID: The ID and current version of this article.
Basket: The basket this article belongs to.
Publication info: The publication-related metadata specified for this article.
CMS info: The CMS-related metadata specified for this article.
Spellchecked: The last time a complete spellcheck was run, if any.
Pictures: The names of pictures that go with this article.
Target depth: The planned or target size (in your preferred units) of this article.
Size: The current character count, word count, and estimated depth of this article.
If you click one of these icons, the associated field(s) will appear as secondary columns in the Article list, which will then be sorted according to the first associated field. (You can change the sorting by clicking on the column headers.) You can go back to the standard two-column mode by clicking on the icon for Article name.
Attachment list
This pane only appears if an article has files attached to it. (It will also appear in the sidebar of the article editor window.)
You can attach files by dragging and dropping them into this pane, or anywhere in the article info pane. You can also copy attachments between articles by dragging them between attachment lists, by opening multiple articles for editing. (To move attachments, simply copy them between articles, and then remove them from the original article.)
If your administrator has configured attachment statuses, you will see a status circle at the bottom left of the attachment preview. Opening a context menu on top of the status circle will allow you to change the status of the attachment, just like for articles.
Opening the context menu anywhere else on an attachment yields a number of other actions one can take:
Open
This checks out the selected attachment to your local machine and opens it in your default associated program based on its file type. You can then edit it, just as you would any local file, while Scoop is still open and the file is checked out. When you are finished editing, you must check the file back in using the “Checked-out files” dialog that Scoop will have automatically opened.
If an attachment is presently checked out (either by you or by some other user), its preview will be overlayed with a ‘lock’ icon to indicate this.
Preview
If the selected attachment is an image in a common file format, this opens a window to preview it.
Edit caption
If the selected attachment is an image in a format that supports XMP metadata, this opens a window to edit the image’s caption.
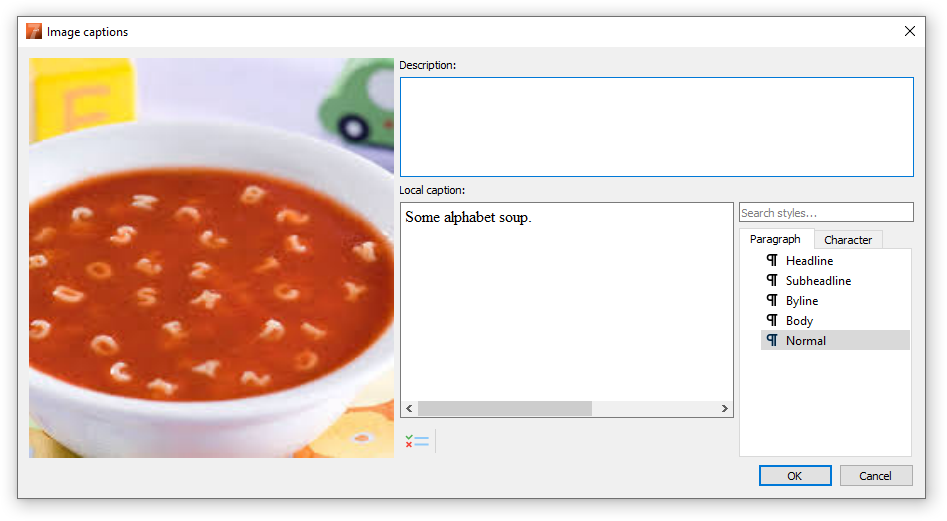
The caption editor functions much like the full Scoop editor (which is discussed in detail further on), with the addition of a preview of the image in question as well as a box displaying the original description (if any) of the image.
Rename
Allows you to rename the selected attachment.
Download to
Allows you to download a copy of the attachment to your local machine.
Delete
Deletes the attachment from Scoop completely. This action cannot be undone!
Article preview
This pane shows the article that has been chosen in the Article list. The complete text is shown in the window, either in what-you-see-is-what-you-get format or raw markup format (based on whether the “Show X-tags” toolbar option is enabled.)
You can select or copy text from this pane and paste it, formatting included, into any open article.
Other features
A few other items in the main window deserve some explanation.
Window menu
The main window, the “Checked out files” window (if in use), and every open article will have an entry in the Window menu, with an accompanying shortcut: Ctrl (or Cmd) + 1 for the main window, + 2 for the second open window, etc. These can be used to rapidly jump to any open ScoopEdit window from most other ScoopEdit windows. (The menu will also appear in open article windows.)
Additionally, there are options in the Window menu to Tile open articles (which will tile the open article windows across your screen) and to Close all (which will close all open article windows, leaving only the main window open.)
File → Export text… and File → Export all versions…
These actions export the selected article as a plain text document, or a series of plain text documents for each version of the article, respectively. This can be useful if one wants to quickly create text files from articles without having to copy, paste, and reformat.
Locating articles
In addition to simply browsing through the list of baskets and then the list of articles contained within those baskets, there are two other mechanisms available to locate articles: a basic ‘find’ mechanism, and a more sophisticated ‘search’ mechanism.
Find in articles
This is a relatively simple single-basket find mechanism. You can open it via Search → Find (or the icon on the toolbar.) Using it, you can look for words or phrases in articles in the present basket.
For example, if you want to find all the articles in a basket that contain the word “News”:
Select the basket you wish to search in.
Trigger the Find action, set “Text to Find” to “News,” set the options and action as you wish, and execute the search.
Search all will search all articles in the current basket, Search selected will only search the articles that are selected in the Article list.
“Select articles” will select matching articles in the Article list, “Mark articles” will highlight the matching articles in red.
You can manually mark, unmark, and select marked articles in the Search menu, or by opening a context menu in the article list.
You can jump between marked articles in the article list by holding Ctrl (or on some platforms, Cmd) and then pressing the up/down arrow keys.
All articles containing the word will now be either selected or marked, depending on your previous choice.
Search in all baskets
In addition to the simple single-basket find mechanism described in the previous section, Scoop also has an advanced search system to find articles in all baskets.
Searches always ‘AND’ the fields together, so all specified metadata fields in an article must match what was specified in the search parameters in order to be counted as a result.
Most of the search fields simply either look for the specified value anywhere within the article’s corresponding metadata (in the case of text fields), perform a comparison against the entire metadata (in the case of Status, Basket, etc.), or accept a range a values (in the case of date fields, etc.)
Full-text search
Unlike the other, relatively simply matched fields just described, the ‘Text’ field performs a full-text search match against the article’s present contents, including word stemming and basic support for the logical operators “AND,” “OR,” and “NOT.”
If you wish to bypass the full-text search mechanisms and simply look for a specific string of text, you may enclose it in either single (') or double (") straight quotes. Note that quotes bypass logical operators, and cannot be used in tandem with them.
Live searches
Towards the bottom of the search dialog, there is an option called “Live search.” If enabled, this will cause the search to be run “live,” that is, if an article is created or altered in a way that makes it match the search parameters, or no longer match the search parameters, it will be respectively added or removed from the search results automatically.
Live searches do not support all the parameters that standard searches do, so note that upon selecting this option, some fields in the search dialog will be cleared and disabled.
Saved searches
If you have a search that is run often and do not wish to enter its parameters each time it must be run, you can click “Save” after entering the parameters for it, and choose a name for it. It will then appear in the drop-down menu attached to the “Save” button.
Searches you save will only appear on your user, but your administrator can configure preset saved searches to appear for all users in your group, as well. These will appear above searches you have saved, separated from them by a divider.
You can delete your own saved searches by choosing one from the list, and then selecting “Delete current” in the saved searches menu.
Searching unlisted baskets
Administrators using ScoopEdit will see an additional option at the bottom of the search dialog, entitled “Include unlisted baskets.” If selected, this will search for articles not only in the baskets that one has access to, but all baskets in the entire Scoop system (including personal baskets.)
Creating articles
To create a new article, select the basket you wish to create the article in, and then choose File → New article…, the New article toolbar button, or press the appropriate shortcut.
Not all metadata fields can be specified directly inside the New Article dialog, but the most important ones generally can be. (Note that if your administrator has chosen not to use certain metadata fields, they may not be visible in the dialog at all.)
While the ‘Name,’ ‘Product,’ ‘Editor’ (which may be hidden if there is only one editor configured), ‘Template,’ and ‘Language’ (which may have only one option each) fields must be specified, the others may generally be left blank (or cleared, if they come with defaults) and filled in later.
Once the new article has been created, the editor will open automatically.
Editing articles
The Scoop article editor is a what-you-see-is-(mostly)-what-you-get editor. It will not (and often intentionally does not) match the precise appearance and metrics of text as it will be styled within publishing software or a web CMS, but it can be configured to mimic it relatively closely.
The editor’s main window has a variety of panes, all of which contribute to the writing and editing workflow.
Rulers
The rulers within the editor give a basic indication of how much space is being consumed by the article. As previously mentioned, Scoop’s article display is not metrically identical to that of desktop publishing software, and so the rulers exist primarily for convenience and not accuracy. (Scoop may even adjust the scale of the vertical ruler if it estimates the article will wind up being longer or shorter than it is displayed as.)
The rulers are displayed in your preferred units, which defaults to your locale’s units. If you wish to use some other units than the default, you may change your preference by opening ScoopEdit’s preferences window (typically using File → Preferences from within the ScoopEdit main window) and then selecting Rulers.
Article contents
This is the pane one actually edits the article contents within. It functions like most other styled text editors: one can type, copy and paste text, find and replace, show invisible characters, undo or redo actions, correct spelling inline by right-clicking on red-underlined words, etc.
If the contents appear too small or too large for your preferences, you can zoom in and out by holding Ctrl (respectively Cmd on some platforms) and then turning your scroll-wheel, by using one of the entries in File → Zoom, or by pressing the accompanying shortcut.
Styles lists
The Scoop editor is a fully style-based editor: there are no text properties like ‘bold,’ ‘italic’, etc. that exist by themselves, but instead only as part of predefined, named styles. There are two kinds of styles: Paragraph and Character. Paragraph styles are also implicitly Character styles, though they cannot be used directly as such.
The paragraph or character style currently under the cursor will always be automatically selected in the styles lists as you navigate through an article.
To apply a style, simply click on it, or press ‘enter’ while the list is focused. Clicking on a paragraph style will apply it to the current or selected paragraph(s), leaving intact any character styles they have. Clicking on a character style will apply it to the current cursor or selected text, clearing any other character styles in the selection. If you wish to remove character styles and reset to the paragraph style, hold Ctrl (respectively Cmd) while clicking on a paragraph style.
Your administrator may have assigned shortcuts for certain styles for quicker application. You can check the Styles menu to see which styles (if any) have shortcuts, and what they are. Additionally, some styles may be configured to automatically switch to a different one upon the creation of a new paragraph.
If there are missing styles in the current article, or any other articles you have opened with the same template since last starting Scoop, they will be displayed in red in the styles list, and with a red-pink background wherever they are used within the article contents.
By default, Scoop separates Paragraph and Character styles into two separate lists. If you want to view just one combined list, enable Styles → Unified styles list.
Styles search box
If you know the name of the style you wish to apply, you can quickly find it by typing in this search box, then (without leaving the search box) using the left/right arrow keys to change style tabs, the up/down arrow keys to select the desired style in the list, and then pressing ‘enter’ to apply it and return to the editor.
You can jump directly to the search box by triggering the respective Quick apply action, found within the Styles menu, by their accompanying shortcuts.
Status bar
The icon at the very left of the status bar indicates whether the article has been modified since it was last saved. If it is a pencil, the document has not been modified since its last save; if it is a floppy disk, then it has been modified.
Following the icon, there is a label indicating the current article statistics: character count, word count, and estimated depth. (The depth estimate will only appear if depth estimation has been enabled by your administrator.)
If there are both an estimated depth and a target depth for the article, then a progress bar will appear following the statistics label indicating how much of the target depth has been reached. Once 100% is passed, the bar will begin turning yellow, then red, to indicate the article is longer than the target depth.
Toolbar
The editor toolbar, placed out of the way as it is generally used infrequently, contains a few miscellaneous items.
Check spelling
The Scoop editor checks spelling automatically as you write articles, and if you have no misspelled words (wave-underlined in red) in the article, Scoop will mark the whole article as correctly spelled automatically, as well. However, if you wish to go through all misspelled words in a systematic fashion instead of working through them within the document, you can choose this item to do just that.
Notes
This button opens the ‘Notes’ panel above the toolbar below the styles lists. (It is also possible to open the Notes panel by itself for an article from the main window.) If an article has Notes, the icon will be displayed with an exclamation point ().
This is the first of two functions the Scoop editor has for keeping notes associated with an article. It is a relatively simple note-keeping mechanism: notes are simply text without any styling, they cannot be edited, only notes just created can be deleted, and they may be marked as ‘complete’ and optionally hidden from view once they are.
Notes in use
The Notes do have a Delete button, but it is limited. You can only delete a note in the same session as you created it. The reason for this is to create an audit trail for notes. More on that in a minute.
Here are a few scenarios.
While you are writing an article you add a Note to the article. After you add the note, you reconsider what you wrote. You can click the delete button to remove it or double-click the note to edit the note. You can do this throughout the editing session of that version of the article.
Once you close the article, any Note(s) you made while writing that version of the article become permanent. Just like the version of the article cannot be changed once it is closed, so too are the notes.
In subsequent sessions in the article, the Notes entered in previous sessions will be available for reading, but they cannot be edited or deleted. You can mark them Complete if you like. You can also create new Notes which will follow the same rules as described above. You can edit or delete them until you close the article. At that point the notes are part of the permanent record.
Notes can be added without opening the article by clicking on the Blue Notes bubble above the Article list. When doing so, the Notes dialog will open for the article you currently have selected in the Article list. Similar rules apply here. You can add, edit, and/or delete the notes you create until you close the Notes dialog. Once you close the Notes dialog, the Notes added will be permanent.
All of this is to preserve an audit trail. Imagine you are an editor and you use a Note to ask a writer if they verified something with someone. The writer responds that they did. After publishing the article it comes to light that the writer did not. You would not want the writer to have the ability to go back and delete or alter the note.
Facts & Summary
The ‘Facts’ and ‘Summary’ boxes for an article may contain styled content, just like the article itself. Unlike ‘Notes’, they will indeed appear for placement on pages along with the article contents. Any content within them is not counted towards the article’s size.
Just as with Notes, it is possible to open the Facts and Summary boxes independent of the article itself from the main window. If an article has Facts or Summary, a pin will appear next to the icon.
Other editor features
There are a few other features of the editor that require some explanation.
Inline notes
In addition to the ‘out-of-line’ notes just discussed, the Scoop editor also supports notes inside the article contents itself. They are distinguished by an orange gradient background.
Inline notes do not count towards the article’s length (note that adding or removing content from an inline note does not change the article’s character or word count!), and when placing articles in page design software, will be transferred as inline notes there, too (if possible.)
You can convert any text to an inline note, or any inline note back to regular text, by selecting text, or placing your cursor inside an inline note, and then choosing Convert to inline note or Convert inline note to text, respectively, from either the context menu or the Edit menu. You can also use Split inline note to begin inserting regular text in the middle of an inline note.
Edit → Change case…
This action allows you to rapidly change the casing of selected text, i.e. from sentence case to title case or vice versa, assistance in cleaning up all-caps text, etc.
Edit → Clean up whitespace
Sometimes when pasting or otherwise importing text from other applications or file formats, a lot of extra whitespace is inadvertently added to documents. This action removes all blank lines and all extra spaces between words and sentences within the current selection or the entire document, to save time when importing such content.
Autosave
Like many other editors, Scoop has a facility to automatically save an open article, based either on time intervals, or the amount you have changed the document.
To enable or change automatic saving, go to the ScoopEdit main window and choose File → Preferences, and then adjust the Autosave settings as desired.
Clips
If there are bits of text that you use often in when writing or editing articles, you can use the Clips feature to save them, complete with styling. You can save a snippet by selecting some text and then choosing Insert → Copy selected clip…, which will prompt you to name the clip. It will then appear in the Insert → Insert clip menu from then on.
You can update a clip either by copying a new clip and giving it the same name as an existing clip, or by choosing Insert → Edit clips and then editing the raw markup directly. (You can also delete clips from within the ‘Edit clips’ dialog.)
In addition to Clips, which are always saved per-user, there are also Snippets, which function much the same way, but globally. (They will also appear in your Insert menu if your administrator has configured some.)
Special characters
The Insert menu contains actions to quickly insert various special characters: frame break, list bullet, em-dash, special spaces, etc. You may wish to a look through the list and at their shortcuts to see if any of them might prove useful.
Sending articles
There are two basic mechanisms for sending articles in Scoop: you can drag and drop article(s) from the articles list in the main window into a basket in the basket list, or you can select some articles and then choose File → Send to select a basket to send them to. (Your administrator may also have configured shortcuts to send to certain baskets, which will appear in File → Quick send to.)
Note that you may not have permission to send articles to or from certain baskets. (Check the permissions icons in the status bar, as described in Main window – Status bar, to determine if you have permissions to send both from and to the pertinent baskets, if you are unable to send articles.)
Generally, most sent articles will be copied, not moved. Only if your administrator has configured both the ‘from’ basket to not keep a copy, and the destination basket to accept moves, will articles be moved instead of being copied.
Conflict sending articles
If an article of the same name as one you are trying to send already exists in the destination basket, and the destination basket does not accept duplicate names (which is the default), you will have to make a choice to resolve the conflict.
If you have ‘Edit’ permissions on the destination basket, or the destination basket is specifically configured to allow it, you will be able to choose ‘Add version’ as a conflict resolution option, which will take the contents of the article you are trying to send and add them as a new version of the existing article.
Otherwise, your options are either to change the article’s name to one that does not already exist in the destination basket, or skip sending it altogether.
NewsBudget
While ScoopEdit may constitute the heart of the editorial suite and suffice for reporters, editors, and paginators to work in, NewsBudget complements this functionality with advanced reporting and budgeting features for overall management of stories and editions across a single product or an entire newsroom.
As NewsBudget permits viewing (and, to a certain extent, modifying the metadata of) any article in the Scoop system, it has its own permissions separate from that of ScoopEdit. If you do not have access to launch NewsBudget, this means your administrator has not granted it.
Along with permission to use NewsBudget comes the permission to modify the “Assigned to” article metadata field.
Selecting parameters
Upon opening NewsBudget, you will be greeted with a dialog asking you to select parameters.
NewsBudget sessions operate primarily on products and publication dates. You can optionally include articles that have no product set, or articles from the product that have no publication date assigned, or with a prior publication date but were not placed, as well.
As soon as you have chosen your desired parameters for this session, NewsBudget will display the list of articles corresponding to your chosen parameters.
If you want to change the parameters after starting a session, choose View → Change parameters…. If you want to start an additional session, click the ‘+’ in the tab bar. Additionally, you can toggle the display of articles contained in private baskets using View → Show articles in private baskets.
Article list
The article list in NewsBudget behaves very similarly to the one in ScoopEdit, with a few notable differences and additional features.
Column selection
Unlike ScoopEdit where one selects a metadata category to view the associated fields as columns in the article list, NewsBudget allows for the selection of any and all metadata fields, through View → Select columns…. You can additionally resize and reorder the columns, and NewsBudget will remember your choices.
Editing metadata
Most metadata fields (e.g. Name, Status, Page, Categories, etc.) can be edited directly from the NewsBudget article list, as if it was a spreadsheet. Simply double-click, or press your platform’s edit key (typically F2), inside an editable field cell selected to begin editing. Pressing Enter or changing focus away from the field will save your changes, or pressing Esc will cancel the edit.
You can edit multiple rows at once by holding Shift or Ctrl (or Cmd on some platforms) while initiating an edit.
You can also select any number of articles and then choose Article properties, either in the context menu or the toolbar, to use the full properties editing dialog, as found in ScoopEdit.
Work offline
The Work offline mode of Scoop allows users to work in Scoop even while disconnected from the network or the internet. The rules are slightly different in this mode, so let’s review the use and the differences of working offline.
The differences
Below is a list of the differences when working offline.
- The only basket you will see is the Local basket. The content you enter in the Local basket is not in the Scoop database, it only exists on your computer.
- Article versioning - There is only one version of the article. Unlike when you work online, there are no versions created.
- Deleted is deleted - There is no recovering a deleted article. If you delete the article from the Local basket, the file is gone.
- You must have connected to the system normally once. The Work offline mode depends on the user connecting to the system once to copy the require configuration files into a local directory for use in offline mode.
- No text import from attachments - While you can attached photos and add captions, if you attach MS Word documents, PDFs, or other text file types, the file will be attached but the content cannot be imported as Scoop relies on server-side functionality for that feature.
- The Local basket is shared by all users of the computer. There is no privact or permissions.
Using Work offline
As noted earlier, to use the Work offline option, you need to have used Scoop online at least once. To work offline, follow these steps.
- Open Scoop
- Click the arrow to the right of the Login button
- Choose Work offline
![Work offline]() width=”50”
width=”50”
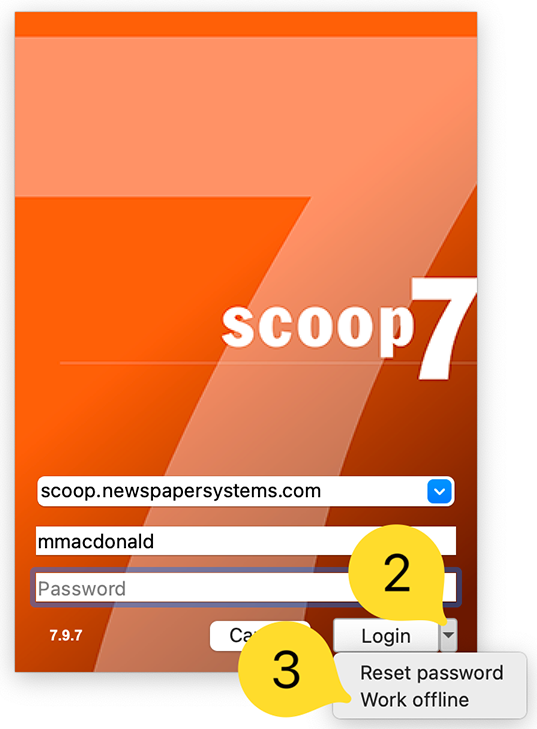
No password is required to Work offline. While working with an article you can attach photos to the article and add captions.
Once you have returned to the office or otherwise connected to your network, you can open Scoop normally and drag the article from the Local basket to the correct basket in the system to continue your normal workflow. When you send an article from the Local basket a new copy of the article is created in the destination basket. After ensuring your article is in the intended location, you can delete the article from the Local basket at your discretion.
Scoop 7
© 2017-2024 Software Consulting Services, LLC.
© 2017-2024 Scoop Publishware AB